
At Bluleadz, we love HubSpot – but we get it, it's not for everyone.
If you're trying to get off the platform, WordPress is probably one of the first options that comes to mind – it does power 30 percent of the internet after all.
If you've tried to use HubSpot's export blog posts feature, you already know that the exports do not contain any of your post content. This sucks!
via GIPHYThe traditional way to get your posts out of HubSpot and into WordPress would be to copy and paste each post by hand. I don't know about you, but the amount of time and effort that would take is insane – no way am I going to do this migration by hand.
Well, fear not, my fellow lazy employee trying to get out of copying and pasting posts for days on end. We've come up with a solution that requires minimal effort and will save you from losing your mind to monotony.

Because of the simplicity of the .CSV file syntax, it's not that hard to generate your own export from a coded HubSpot template.
Here's how to do it.
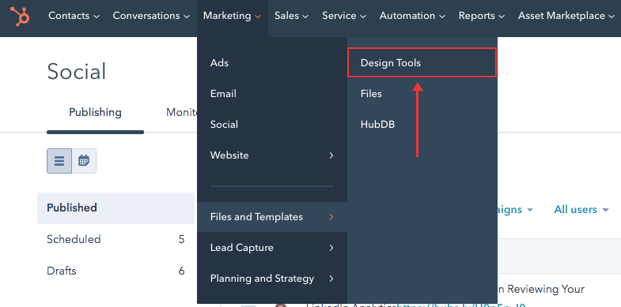
1. Navigate to Your Design Manager.
In your HubSpot portal, hover over the Marketing tab. Then, hover over Files and Templates and click on Design Tools.
2. Create a New Blog Template.
In the Design Manager, click the orange "Create a new file" button in the top right and select the "HTML & HUBL" button in the pop-up. Then, make sure:
- Template is selected.
- Template type is "blog."
- Name the file "Blog Exporter."
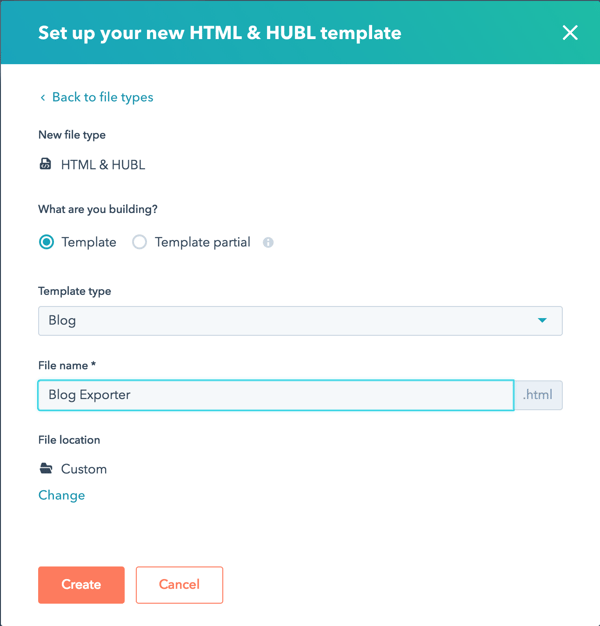
Note: You can choose to place this new template in your root (main) Design Manager location, or you can place it in a custom location to keep your Design Manager organized to your liking.
Once you're done, click "Create."
3. Copy and Paste the Following Code.
Upon creating a new coded template, a new tab will appear with default code in the HTML area.
Remove all of the default code inside this new file. Then, copy and paste the following snippet and update it to reference the blog you'd like to export. To do this, replace YOUR_BLOG_ID_HERE in the snippet with your HubSpot blog ID.
Note: The blog_recent_posts function listed in this snippet can output up to 200 posts. If you need to export more than 200, please see step 3a.
{% set export = blog_recent_posts('YOUR_BLOG_ID_HERE', 200) %}
"post_title","post_slug","post_date","post_content","post_thumbnail","post_author","post_category",<br>

{% for content in export %} "{{ content.name|forceescape }}","{{ content.slug|forceescape|replace('blog/', '') }}","{{ content.publish_date_localized|forceescape }}","{{ content.post_body|replace('"','""')|forceescape|escape_jinjava }}","{{ content.featured_image }}","{{ content.blog_post_author }}","{{ content.topic_list|forceescape|replace('[', '')|replace(']', '') }}"<br>{% endfor %}
How to Find Your Blog ID
If you aren't sure what your HubSpot blog ID is, you can easily find this in your blog dashboard URL.
Your blog dashboard URL probably looks something like this:
https://app.hubspot.com/website/00000/blog/posts?author=all&blog=012345678&campaign=all.....
The nine numbers following author=all&blog= is your blog ID!
A Note For Adding Your Blog ID to the Above Snippet
When adding your blog ID to the snippet provided above, make sure to keep the single quotation marks before and after it. Removing the single quote marks will break the code and cause an error.
Your template should now look like this:

3a. What to Do If You Need to Export More Than 200 Posts
Because of the 200-post cap, you will need to copy and paste a different snippet if you wish to export more than your 200 most recent posts.
With this snippet, you can export up to 1,000 of your most recent blog posts in HubSpot.
Before copying and pasting the below code, you will need to temporarily adjust the number of posts per listing page on your live blog because this coding will only pull as much content as displayed on your first blog listing page. For context, each of the Bluleadz listing pages has 18 blog posts.
To change this number:
- In your blog dashboard, click the gears icon in the top right of your portal to go to your blog settings.
- Click the templates tab.
- Change the number of Posts Per Listing Page (1-999).
- Click save.
DISCLAIMER: Keep in mind that altering this number will alter the number of blogs that appear on each page of your live blog. Once you preview your coding, you will need to go back and change it to what it was before.
Now, copy and paste into your HTML area.
{% if is_listing_view %}
"post_title","post_slug","post_date","post_content","post_thumbnail","post_author","post_category",

{% for content in contents %} "{{ content.name|forceescape }}","{{ content.slug|forceescape|replace('blog/', '') }}","{{ content.publish_date_localized|forceescape }}","{{ content.post_body|replace('"','""')|forceescape|escape_jinjava }}","{{ content.featured_image }}","{{ content.blog_post_author }}","{{ content.topic_list|forceescape|replace('[', '')|replace(']', '') }}"
{% endfor %}
{% endif %}
We suggest working with a developer to make sure everything is done properly and refactored back to normal!
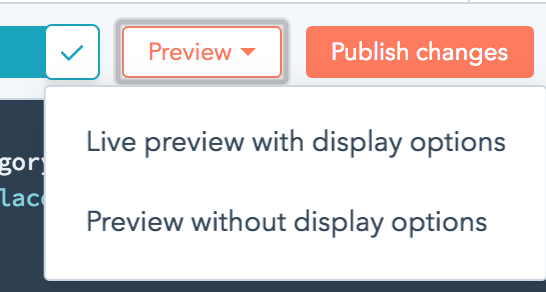
4. Preview the Page.
From this point, you should preview your blog listing by clicking on the "Preview" dropdown and selecting "Preview without display options."
Doing this will open up a new HubSpot preview tab with a ton of coding. Select all the text in the preview and copy it. (If you're using a Mac, the CMD+A shortcut will help you out with this.)
*Remember, if you performed step 3a, once you preview and copy the coding, go back to your blog settings and re-adjust the number of posts per listing page to reset your blog back to normal.*
5. Save the Template as a .CSV.
Open any text editor (Visual Studio Code is great and free) and paste your copied text into it:
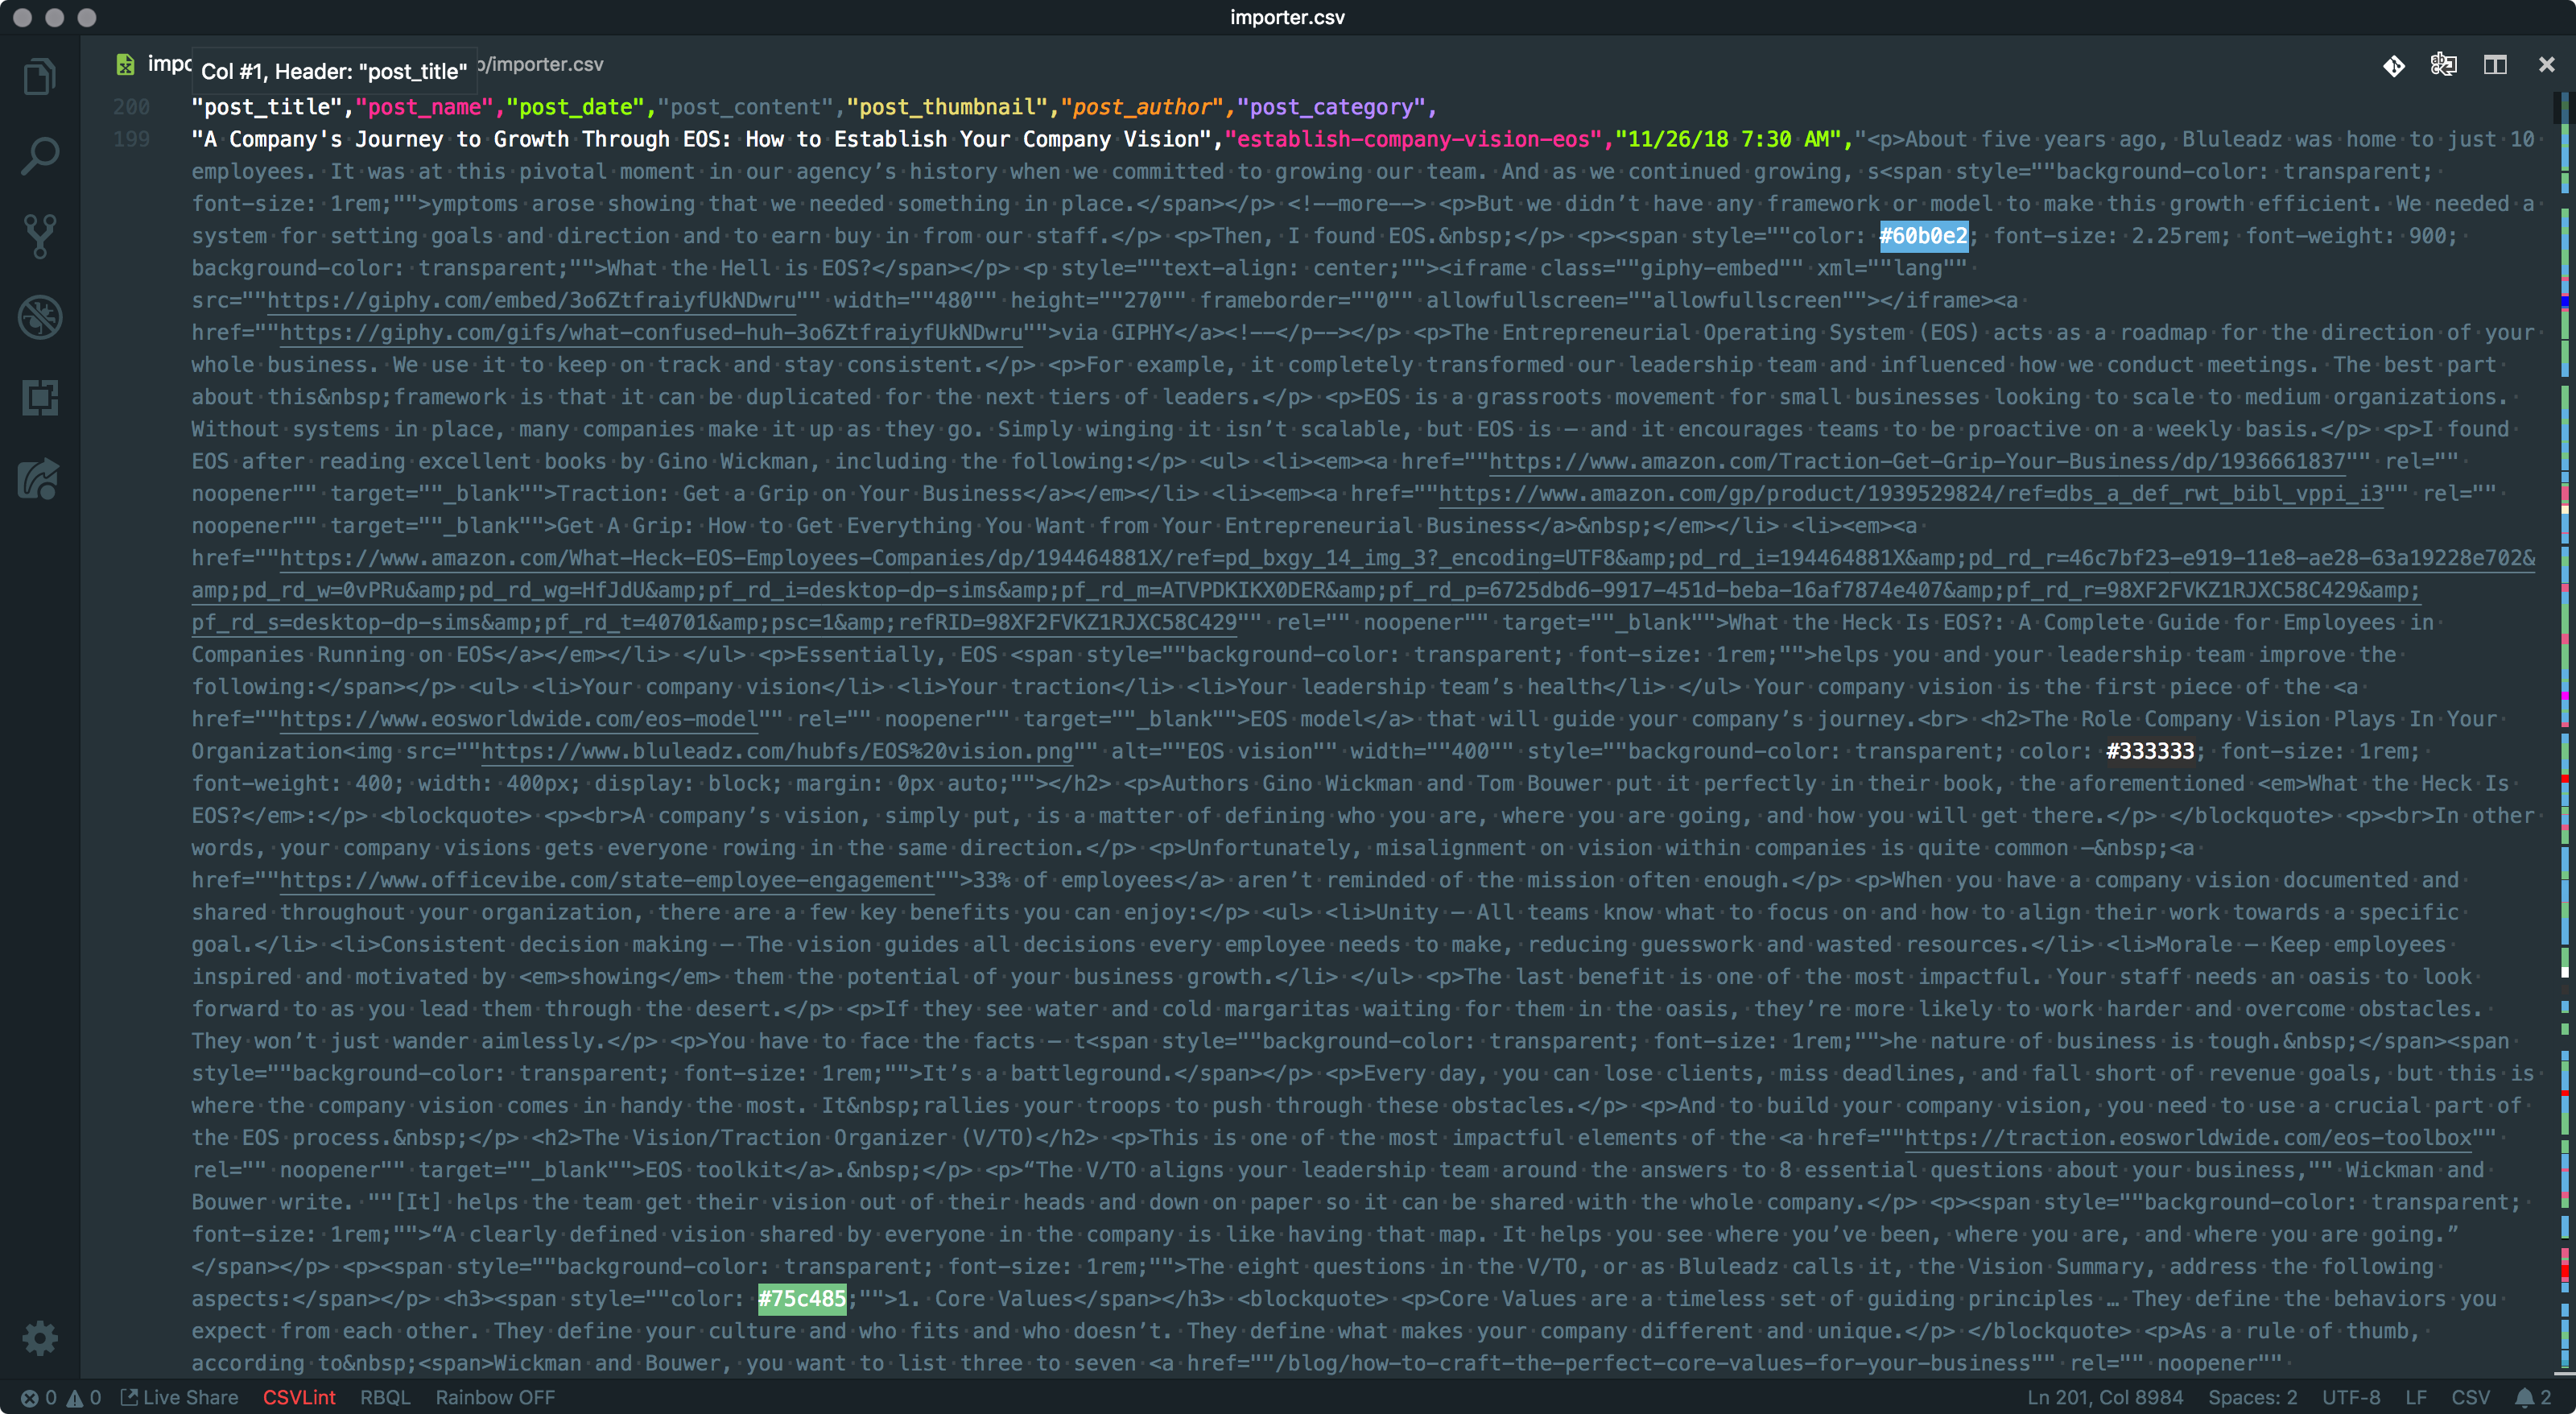
Finally, save the file as importer.csv.
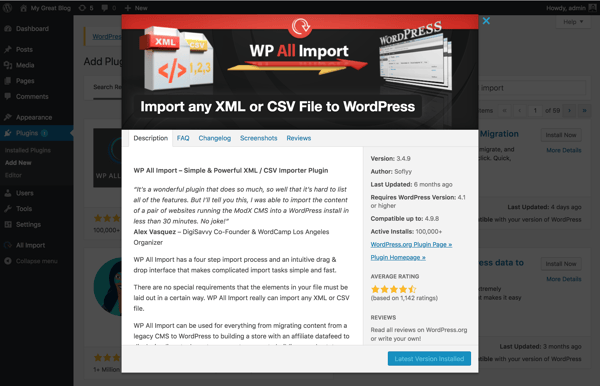
6. Install WP All Import.
At this point, we're done in HubSpot. (Woohoo!)
Next, you'll want to install and activate WP All Import. While the plugin is free, they do offer a Pro version that will automatically download all of your images and upload them into your WordPress install for you during the import, which is very handy.
7. Head to Your WordPress and Upload Your CSV File.
You should now have a new Admin Page called "All Import" accessed from the new item at the bottom of your Admin Sidebar called "All Import."
Click the "All Import" tab. Then, click "Upload a file" and select your .CSV. Once it uploads, click "Continue to Step 2."
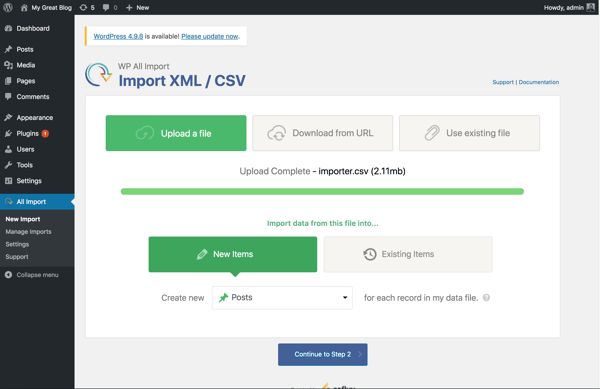
Step 2 is simply a preview of the data it gathered from the .CSV. If you've been following along carefully, everything should be fine and you can continue straight to step 3.
8. Drag and Drop Your Data.
In step 3, we'll be mapping all the data to their WordPress equivalent fields. Simply drag the field name from the right sidebar into the content area you would like to match it to.
To start, drag "post_title" and "post_content" into the title and content fields respectively.
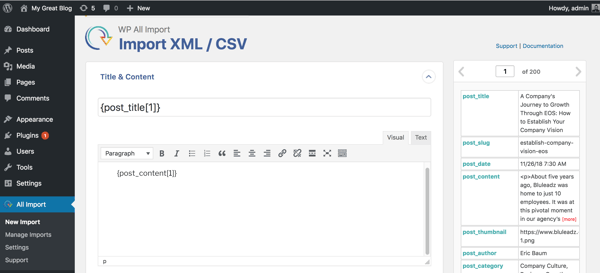
If you purchased the Pro version, you can configure the image importer by expanding the "Images" accordion, but the default settings should be fine.
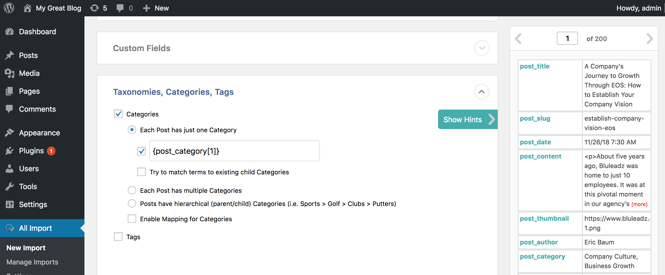
9. Check the "Categories" Checkbox and Drag and Drop Your Post Category Coding.
Next, expand the "Taxonomies, Categories, Tags" accordion. WordPress has a much more robust taxonomy system than HubSpot does, but a HubSpot Topic most closely relates to a WordPress Category.
Check the "Categories" checkbox and drop "post_category" into the field that opened up.
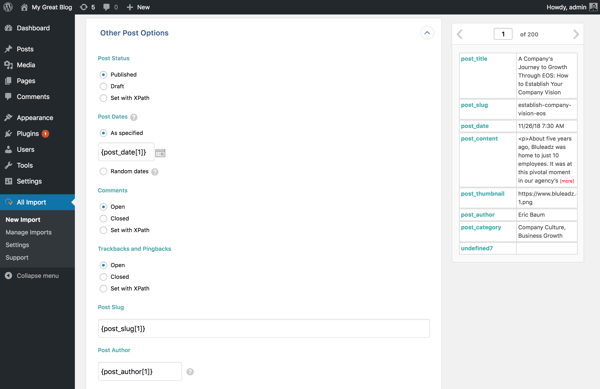
10. Drag and Drop the Rest of Your Data.
Finally, open the "Other Post Options" accordion to map the final bits of data.
First, under "Post Dates," replace the word "now" with "post_date."
Then, drop "post_slug" into "Post Slug" and "post_author" into "Post Author." Note that you'll need to have already added all your authors as users for the "Post Author" name import to work. You should have something like this:
Click "Continue to Step 4."
The tool needs a way to uniquely identify each post. Simply click "Auto-detect" and it should automatically find a unique value for you (likely "post_title"). Click "Continue."
11. Confirm and Run Import.
You should see an import summary. If everything looks right, click "Confirm and Run Import."
After a few seconds, you should see "Import Complete." Go to Posts from the Admin Sidebar to see all of your imported blog posts.
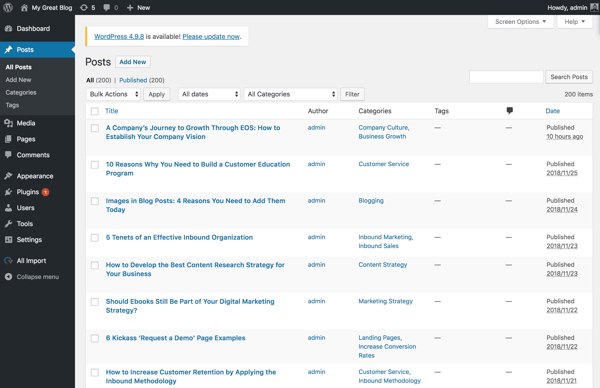
Congratulations, you just made yourself a .CSV containing all of your HubSpot blog post data AND imported it into your fresh WordPress install!
Steven Kielbasa
Visual communicator, dad, gamer, fixed-gear cyclist, re-poster, random commenter, Art Institute grad, and all around nerd.