
If your business wants to start blogging regularly, it takes some time. Time to come up with ideas, write the content, optimize your articles, and hit publish.
Because of this, it can be tough to establish a foolproof, expedited process to publish more content in a shorter amount of time.
But, with the right tips on blog ideation and outlining, your content team can do just that.
What Is a Blog Outline?

A blog outline is a general layout of your blog content, where you can note the basic structure that you want a blog post to take when you’re writing it.
In a blog outline, a writer notes the main subsections of your article and the main points within those sections. That way, the most important information can guide the rest of the article.
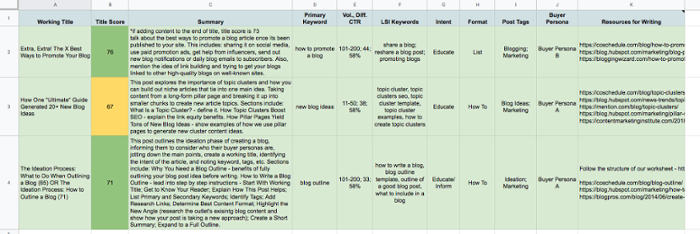
However, in this post, we will also dive into a blog structure outline, which maps out what your article is about, who it’s being written for, the primary and secondary keywords to include, as well as any inspiration or handy resources you may have found in your research.
Why Your Content Team Should Outline Your Blog Structure
If you’re anything like us, you have more than one copywriter writing daily for your blog. On our internal marketing team, we have three kickass writers that dedicate their time researching and crafting up some awesome content to share with our readers.
But, when you have more than one writer, it can be hard to make sure that each individual is following proper blog formatting and including all the essential sections that were originally intended for the article.
Here’s why your content team needs a handy blog outline spreadsheet:
An Ideation Outline Speeds Up the Writing Process.
During the ideation phase, you’re just beginning to flesh out what each article will be about. During this ideation phase, mapping out the basic structure of your post can make the actual outline and writing process move much quicker.
You Can Build an In-Depth Backlog of Great Content.
If your business is constantly creating and publishing content for your blog, it’s possible to run out of ideas at one point or another.
But, by pre-planning out all your content, you can build up a ready-to-write backlog of great content that’s already been researched and detailed.
You Can Organize All Your Ideas in One Central Location.
Beyond speeding up the writing process and building up a backlog, you can store all your ideas within one, organized spreadsheet.
That way, when it comes time to write, your copywriters can pick and choose what they want to write, with all the essentials noted for them.
The Ideation Phase: How to Create a General Blog Outline
Think of this step as your outline for the outline. During your brain dump of content ideas, you should start building out a generic idea for each post so when it comes time to writing, it’s not a guessing game.
Here’s the most important steps you should make at this stage:
1. Start With a Working Title.
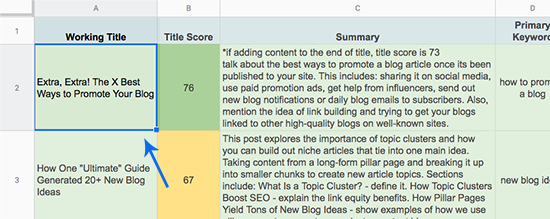
To get your feet off the ground with a blog outline, it’s best to start with the title.
We love using CoSchedule’s Headline Analyzer to experiment with titles that work well for your topic, but don’t worry if you can’t nail the perfect title on the first go around. This is just to get a better idea of what direction the article will take.
2. Identify the Buyer Personas You’re Targeting.
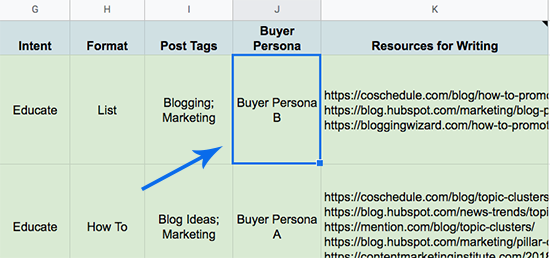
Who are you writing this post for? Buyer personas are a fictional representation of your ideal customers, and they also represent your ideal blog readers.
By identifying this early on, you can be sure to include proper keywords and address pain points that they relate to when you begin writing.
3. Explain the Post Intent.
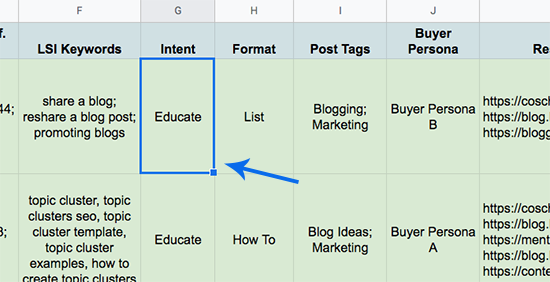
You aren’t just writing a random piece of content to publish to your blog. You should always aim to provide value to your readers. Define the intent of your post and why you’re writing it. Your intent could be to:
- Deliver entertaining content
- Inform readers of new trends
- Educate readers on a tactic
- Curate other content
- Much, much more
The point of this section is to just be clear about the “why” behind your post as you outline.
4. Determine Your Article Format.
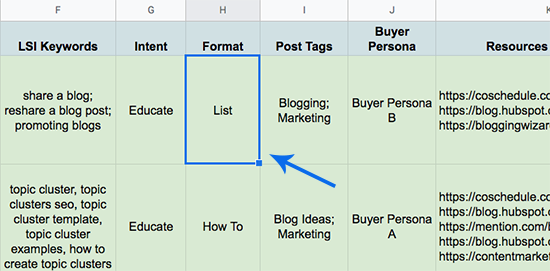
To better prep for how you'll draft up the article, determine what format you want your article to take.
Here are the most common article formats you can choose from:
- List Post
- How-To Post
- "What" Post
- "Why" Post
- Curated Post
- Newsjacked Post
If you plan on writing an article in a different format than the ones listed above, just jot down your ideas for how you will format the piece so your content team can understand what the article will look like.
5. List Out Any Primary and Secondary Keywords.
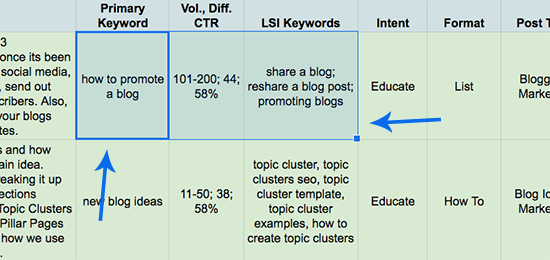
With proper keyword research, you should be able to identify the top-performing keywords and semantically-related keywords and phrases that relate to your post.
Noting these during the ideation phase will tell the copywriter who ends up claiming the piece to make sure they sprinkle them throughout their post and include them in any headers.
6. Identify Your Tags.

Blog tags help organize content, grouping related pieces together. When you use blog tags on your website, visitors are able to check out all the articles with a particular blog tag.
Jotting down what blog tag the article aligns with will ensure you aren’t writing too much about the same exact topic. Variety is key in a successful business blog, after all!
7. Write a Quick Summary (With Sections).
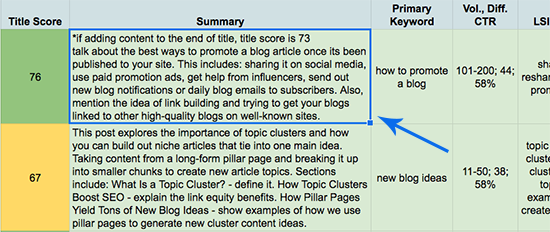
Before you actually begin the outline, quickly list the main sections that should be included in the post.
The best way to figure out what sections an article should have would be to ask who, what, when where, why, and how. Chances are, at least three of those questions would work great as subsections!
8. Include Links to Research and Inspiration.
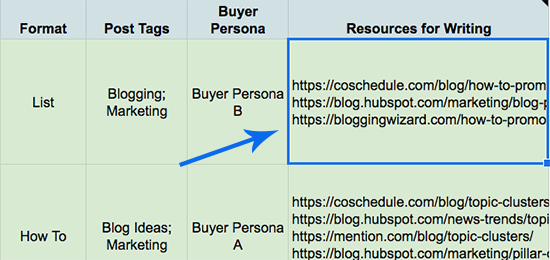
During your initial research, you’re sure to stumble upon some awesome resources that helped you map out the structure of your article. So, share the links to these inspiration pieces in your blog outline. That way, the copywriter who writes the piece will have quick access to them.
Now that you’ve outlined all the structural elements of your blog, you’re ready to start the actual outlining process of your content.
Ready to Write: How to Outline Your Blog First Draft

With your initial outline in place, you’re ready to rock and roll with the actual writing process. Here’s how you can get started with a blog outline.
1. Draft Up Your Main Headers and Subheaders.
From your ideation outline, you should have gotten a basic idea as to what sections you will be discussing in the article copy. Bullet these sections out in your document for later to help guide your writing.
2. Briefly Bullet Out the Main Ideas of Each Section.
via GIPHY
Once you bullet out the main sections of the article, you can start adding additional bullets to highlight the main points you want to cover in each section. By doing this, you can ensure you don’t leave out any important details.
3. Add Any Relevant Statistics or Research You Wish to Include.
In addition to the main ideas, jot down any relevant statistics you may have found in your research and paste in the URL where you discovered it.
This will be useful when you’re writing because you’ll already have the source link to hyperlink your data to – no need to dig around through your browsing history to relocate it later.
4. Start Filling in Holes With Content.
Now that you’ve bulleted out the basic structure of each heading, you can begin to fill in the gaps with content. Add in descriptive details, and start typing away, using your main ideas as a reference.
Note any necessary lead-in lines you’ll need to write to better transition your article from one section to the next. (We like to type in {lead-in sentence} and highlight it in red so we know to go back later and add it.)
5. Tweak Your Outline as Needed.
via GIPHY
As you begin to write, you might find that your sections flow better in a different order. Feel free to switch them around as you continue to write until you find what order works best.
Don’t forget to make any changes to your transitions if you do make any changes to the overall structure of your post.
6. Finish Writing the Body Copy, Then Write the Introduction and Conclusion.
Some people prefer to write beginning to end, and that’s perfectly fine. However, some of our copywriters choose to tackle the body of the post first, and then work backward to write a complementary introduction and conclusion.
That way, you can ensure your introduction better flows into the topics you discuss and your conclusion wraps up all your main points.
7. Finalize Your Draft.
At this point, you’ve pretty much finished the first draft of your article – that was easy!
By outlining your blog before writing, you can speed up your writing process immensely – with the main ideas already listed out for you, it’s just a matter of flowing it all together in neatly written paragraphs!

Baylor Cherry
Baylor is an inbound specialist for Bluleadz. As a native Floridian, she enjoys soaking up the Florida sun, buying clothes she can’t afford, and dreaming about one day owning a dachshund.