
Closing deals is a must for any business. After spending weeks, months, or even years nurturing leads down your sales funnel—moving them from unknown contacts to leads, marketing-qualified leads (MQLs), and then sales-qualified leads (SQLs)—you want to seal the deal as efficiently and effectively as you can.
While your first thought for closing deals might be holding meetings with hot prospects, sending targeted email content, or assembling proposals for them to review. However, there’s another feature of your HubSpot portal that you shouldn’t ignore in your HubSpot deals pipeline management strategy: HubSpot deal tags.
What’s the deal with HubSpot deal tags? Let’s dive into why you should be tagging your HubSpot deals, what deal tags are, and some best practices for using these tags in your HubSpot portal.
What Are Deal Tags in HubSpot?
HubSpot deal tags are a feature in HubSpot available to Sales Hub subscribers on a Starter, Professional, or Enterprise subscription tier. These colored tags help deals in your deal pipeline stand out visually from others and can serve as a quick indicator of a deal’s importance or an issue with the deal that needs to be resolved.
Tags can be an essential way for users in your HubSpot portal to organize and categorize deals by making them easier to label and filter them based on specific characteristics. For example, you could create a deal tag for deals where the customer has had a recent interaction with your brand and mark them as “hot leads” or something similar to let sales reps looking at the deals pipeline see that a prospect in a deal in the pipeline has had a recent interaction.
Once created, the tags will automatically be applied to all deals that meet the filter criteria you use for it—more on that later.
Note: To create a deal tag, a user needs to have a paid Sales Seat assigned to them in HubSpot.
Benefits of Using Deal Tags
So, why should you use deal tags? Why go to the effort to start marking your deals in HubSpot with colored dots? Well, there are a few potential benefits of using deal tags, such as:
Improving Organization
Deal tags can be a useful way to categorize and sort your deals in the HubSpot Deals tool with an “at a glance” visual reference. This can make it easier to locate specific deals in the tool or filter out deals that you don’t need to interact with right away.
Enhancing Efficiency
Say that you want to track down a deal that you can’t quite remember the name of, but you want to focus on it because of its total value and that it was being administered by a specific team or sales rep.
You could create a tag that marks deals that match those criteria and then, at any point in the future, look for that tag to find deals that meet those criteria.
Ensuring Prompt Follow Up
Speed of response can be critical for successfully closing deals. Delays in response during the final phases of the sales funnel can make a prospect assume that there will be delays in service. This, in turn, can cause a formerly-excited prospect to back out of a deal.
Deal tags based on recent activity by a prospect can help sales reps quickly identify deals in the pipeline that need an immediate follow-up to help the prospect stay engaged.
How to Create and Add HubSpot Deal Tags
So, how can you create a deal tag in HubSpot? Here’s a quick step-by-step of the process:
- Go to your Settings menu in your HubSpot portal (click the gear icon)
- In the left nav menu, click on the “Objects” dropdown under the “Data Management” header
- Click on “Deals" from the dropdown
- Click on the “Pipelines” tab
- Scroll down to and click on the “Customize deal tags” option

- Click on the “Add tag” button and choose a preset or “Create from scratch”
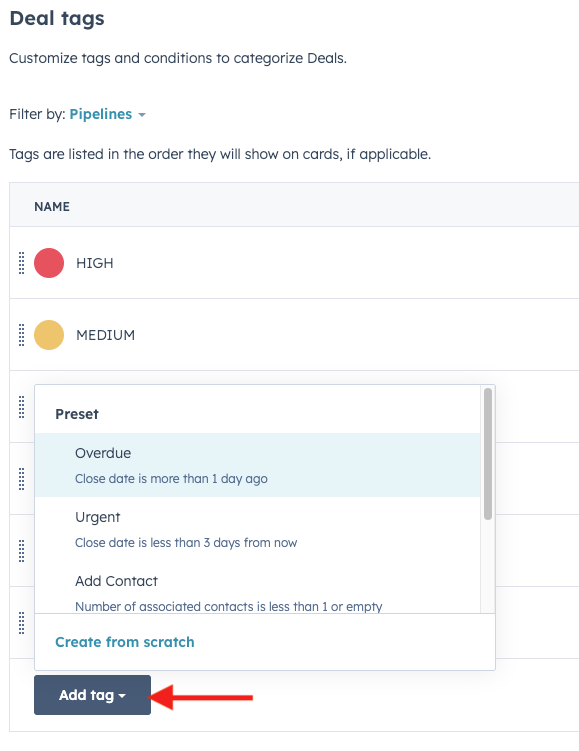
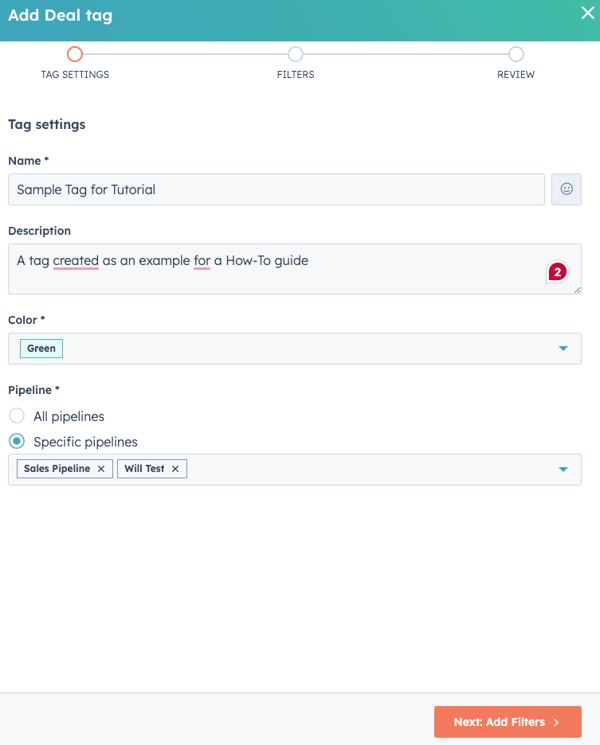
- In the dialog box that slides in from the right, give your new tag a name, description, and a color, then choose whether to apply that tag to all of your pipelines or to specific pipelines
- Click “Next: Add Filter” when ready
- Add filters to your tag by clicking the “+ Add filter” button
- filters can be applied based on deal properties or based on associated properties and objects such as activity, contact record information, invoices, etc.
- Here’s an example of a filter for deals with an associated invoice due in less than a week:
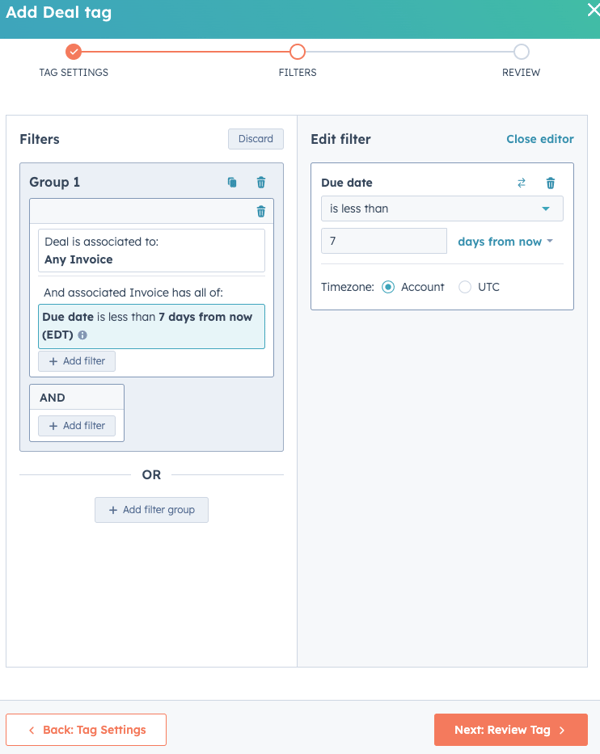
- Click “Next: Review Tag” when finished adding filters
- Review your tag settings to ensure they’re all correct and click “Save” in the bottom right when complete or click on the “Back” button to go back and edit your tag before it goes live
Congratulations! Your new deal tag is live and ready for use. It will automatically start appearing on whichever deals meet the tag’s filters in the pipelines the tag was applied to.
Deal Tags to Create
So, now that you know how to make deal tags, what tags should you create? The answer is that you should create tags that help you with your business’ specific sales process, which may vary depending on your sales processes, resources, and needs.
Here are a few generalized deal tags that most businesses should create:
- Priority Tags. A simple set of tags that mark deals as High, Medium, or Low-priority based on simple criteria such as the priority assigned to the deal by the Estimator/Drafter of the deal during its creation or the deal amount. This can serve as a quick way to filter which deals are the most important for sales reps to follow up on with an at-a-glance view.
- Follow-Up Needed Tags. Tags that are applied when some kind of urgent action is needed on the part of the sales team to close a deal. For example, you could set a filter for when a contact associated with a deal has clicked on links in an email more than once or twice (indicating a strong chance to close if they’re followed up with immediately). You might set different triggers based on what you use to define a “hot lead” in need of follow-up.
- Invoice Reminder Tags. These tags would indicate that a deal has an associated invoice due in a set amount of time. This could help sales or service team members communicate with customers who have an invoice due soon to remind them to pay.
These are just a few examples of the kinds of tags you may want to apply to your deal pipelines—the combinations of filters you could set are practically endless. Feel free to experiment a little with your deal tags, see what helps your team quickly sort deals and take action when necessary.
Best Practices for Using Deal Tags
So, what are the best practices that you should follow when creating deal tags and using them in HubSpot? Here are a few simple things that you can do to make the most out of your deal tags:
Establish Clear Guidelines
What are the guidelines for creating and using deal tags in your HubSpot portal? Setting up some ground rules for creating new tags can be important for preventing confusion later on. Standardized tagging practices help keep things consistent so users in your HubSpot portal can rely on the tags to clearly indicate what they need to know at a glance.
Some example ground rules to create include:
- Rules for choosing tag colors. You don’t want all of your tags being the same color!
- Rules for how many tags should be applied to any given pipeline. Having too many tags can quickly become confusing. Keep it to as few tags as possible so users can quickly distinguish tags.
- Setting which pipelines to create new tags for. Making tags specific to the sales pipeline that they will be used for helps you increase granularity of your tags without making every pipeline a confused mass of tags.
- Assigning tag creator roles. Control who can create tags so that a bunch of redundant tags aren’t created by accident—too many cooks really can spoil the broth!
Regularly Review and Update Your Tags
Every business undergoes some change sooner or later. As your business model and processes continue to evolve, it’s important to revisit your use of deal tags and refine them to make sure that the criteria that trigger your tags are still relevant to your business.
For example, say that you had previously set up a tag to mark deals as Urgent or High Priority if they exceeded $2,500 in value. However, your business has grown exponentially since then and now markets to a higher grade of clientele where a $25,000 deal is more common. Odds are that you would need to edit your deal tags to reflect the new scale of your average deal size.
Collect Feedback from Your Team
How is your team benefitting from or using the deal tags in their HubSpot Sales Hub tools? Be sure to reach out and collect feedback to discover how your team is leveraging tags and if they’ve noticed anything that could be improved on.
If they aren’t seeing a benefit from the tool, try to find out why they’re struggling so that you can improve your tag use or the training of your sales reps as needed.
Get Help Mastering Your HubSpot Deal Tools!
Tags are just one of the many tools that HubSpot has to offer in their Sales Hub that, when mastered, can help your business meet its goals.
If you would like to learn more about how to leverage deal tags or other HubSpot tools to achieve your business goals, reach out to the experts at Bluleadz. We have years of experience on the HubSpot platform and have helped many businesses apply their HubSpot tools to improve their marketing, sales, and service results.

.png)
Comments