
I’ve been HubSpotting for over 3 years now and I’m always finding new tricks, tips, and hacks to navigate and simplify HubSpot.
Although the marketing automation software is very intuitive and has a great UX, it’s still a huge platform with a lot of different functionalities to master.
Below are 12 HubSpot optimization tips you may or may not have known about:
1. Create & Save Custom Reports
When looking at your Analytics Tools, do you ever wish that you could save a couple different versions of the data you’re looking at? Well, you can, with custom reports!
Navigate to Reports > Reports Home. Click “Create a new report” and follow the prompts to create all of the custom reports you need, whether they're sources reports, attribution reports, contacts reports, or others.
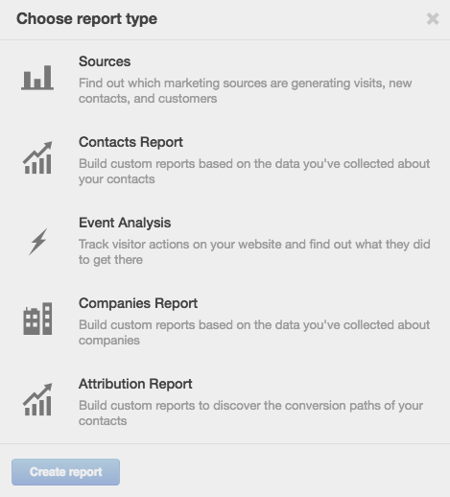
Please note that Contacts Reports, Companies Reports, and customized Attribution Reports are available for Enterprise customers only.
2. Automatically Email Reports
Now that you know you can create and save custom reports, you can also get these custom reports emailed to you, your boss, your clients, or whoever needs them.
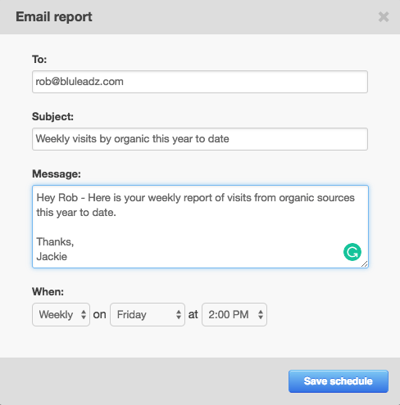
Simply find the custom report you want to share, click the gear icon to the right of it, click “Email report” and type in the information it asks for. You can choose to send the report just this one time, right now, or choose a recurring daily, weekly, or monthly email.
Bonus! Email recipients don’t need to be HubSpot users in order to view these emailed reports. This is useful for any clients that have upper management that might not want or need to have a HubSpot account, but still want to receive reporting.
It's important to note that all of the report types except Event Analysis can be emailed.
3. Create a Naming Protocol for Workflows
Workflows can get confusing. You can have multiple workflows around the same topic that all perform different functions. It's helpful to name your workflows based on what action they're performing or triggering.
You can have workflows for a series of lead nurturing emails, updating contact properties, sending internal email notifications, and a whole lot more. So, believe me, it’s definitely helpful to establish a protocol for how you’re going to name each of these types of workflows.
4. Set Goals for Your Workflows
Why should you set workflow goals? For one, they help you track the success of your workflow. Secondly, they help you focus on what actions are important for your website visitors to take in order to move through the buyer’s journey.
In addition, once any of the enrolled contacts meet a goal, they will automatically be un-enrolled and removed from the workflow.
5. Automate Tasks With Workflows
You can save yourself A LOT of time and frustration by automating common and simple tasks, such as updating contact properties, sending follow-up emails, notifying your team of form submissions, and MUCH more.
Here’s a HubSpot Academy article to help show you how to change contact properties using workflows.
6. Use Hidden Form Fields to Collect Contact Data
Similar to automating tasks with workflows, you can set contact properties by using hidden form fields. For example, if you have a contact that fills out a bottom-of-the-funnel (BOFU) form, and based on the criteria for your lifecycle stages, is defined as a Sales Qualified Lead (SQL), you can include the “Lifecycle Stage” contact property as a hidden form field and pre-select “Sales Qualified Lead” as default to automatically assign the lifecycle stage when that BOFU form is submitted.
This will save you the time of having to set up a SMART list for this and/or a workflow to automate setting the lifecycle stage.
Here’s a HubSpot Academy article that shows you how to add hidden fields to your forms.
7. Block Free Email Providers
I recently had a client who asked if we could block email addresses with domains like gmail.com, yahoo.com, hotmail.com, you get the picture. I quickly discovered that I could block all free email domain providers (which I might add is a very comprehensive list) with the click of a button.
To do this, simply navigate to your forms, choose a form to edit, click the email form field and check the box to “Block free email providers.” Voila!
8. Use Lead Flows
You can see from a couple of my previous blog articles (Why & How You Should be Using HubSpot Lead Flows on Your Website and How To Create a Lead Flow in HubSpot [Vlog]) that I love lead flows.
They’re a quick, fun, and easy way to generate website leads. The most important thing to remember with lead flows is that you have to make sure they’re relevant to your website visitors.
9. Clone, Clone, Clone!
If HubSpot’s clone feature isn’t already your best friend, it needs to be.
HubSpot created this awesome feature in pretty much every single one of its tools. It lets you clone an existing piece of content (or whatever it may be) so you never have to build the same thing from scratch more than once.
The following are just a few examples of items you can clone in HubSpot (the list goes on and on):
- Lists
- Forms
- Workflows
- Landing pages
- Website pages
- Emails
- Lead flows
Most of the time, you can find the clone feature under the gear icon.
10. Resize Stock Images to Improve Load Times
You may not have given this much thought, but the size of the images on your website contribute to how quickly your pages load. Depending on how much patience your potential website visitors have, they may not even end up staying a website visitor if your pages take too long to load.
I use Adobe Photoshop to resize my images, but you can also use HubSpot’s Photo Editor.

11. Use Flexible Columns
This is more on the design/development side of HubSpot, but it makes life easier for us marketers. Flexible columns can be included at the template level of any of your website pages.
In simple terms, flexible columns allow you to add as many modules as you want to a particular section of a website page without having to edit anything at the template level, or ask you designers or developers for help.
For example, flex columns are perfect for Resources pages. New content offers are always going to need to be added to your Resources page, so, using a flex column makes it easy to jump in edit mode, add another resources module to the flex column, add the info for your new resource (image, title, landing page link, etc.), and update the page. Easy peasy!
12. Batch Upload Tweets
HubSpot social media tools are great ways to save time with publishing posts, as well as stay on top of social media interactions and monitoring. In the social media publishing tool, you can schedule posts on Facebook, Instagram, Twitter, LinkedIn, and Google+.
For Twitter in particular, instead of spending your time scheduling out multiple Tweets a day, every single week, you can save time by scheduling in bulk.
This HubSpot Academy article will teach you how to schedule your Tweets in bulk!
And There You Have It!
Looking for more HubSpot hacks? Check out these 5 additional HubSpot hacks to make your life a bit easier! Have some HubSpot hacks of your own? Let us know in the comments below!
.png)
Comments