
Designers creating new website mockups will generally use Photoshop, then save those mockups as a JPG or PNG for the client to review.
The problem with static images is they don't tell the whole story of what the website could be. Hover state, the way the page loads, or even the way the page transitions to a new view — these are all elements that are usually not given any thought and are left up to the developer to make assumptions.
Or worse, they're not implementing anything at all.
What you're left with is a website that feels outdated and uninteresting.
Great website designs should employ modern elements that give websites that "wow" factor, and that includes animations.
Let's take a look at a few tips to help you make better animations for your website, along with some easy steps you can take to create animation prototypes in Adobe XD and CodePen.
What Is Adobe XD?
AdobeXD is a user experience design tool for apps and websites that can be used to create full designs, mockups, and prototypes. Adobe XD is best for teams of designers and developers or individual designers and developers who want to create in a vector format.
It works for a variety of projects and collaborators because it is easy to scale. Some of the benefits of Adobe XD include the following:
- It's user friendly.
- It's great for demoing prototypes because it's interactive.
- You can involve your client or account handler in the design process with ease.
- It has full integrations that cut production time.
The Best Adobe XD Features
Here are some of the best features available on Adobe XD:
- Voice prototyping: Make voice command, and give your designs sound with voice features.
- Auto-animate: Add motion effects, visual feedback, and smooth transitions without coding or multiple tools.
- Scroll groups: You can build interactive carousels and select specific areas of your designs for scrolling.
- Blend modes: Combine layers and images to create cool stylistic effects.
- Anchor links: You can move to different points in your design easily with clickable links. You can also create scroll-to-top interactions.
- 3D transforms: Make your designs move in a 3D space to give them depth and perspective.
- Components: Create reusable buttons that sync across all designs.
- Coediting: Collaborate with your team members in real time to stay aligned no matter where you are.
- XD plugins: Plug in other programs and apps to enhance your design and automate tasks.
- Overlays: Create slide-out menus, on-screen keyboards, dialog boxes, and more by layering content.
What Is CodePen?
CodePen is an online social environment for developers and front end designers that allows them to test and showcase their CSS, JavaScript, and HTML pens or code snippets.
It is a great community for building and deploying websites, learning, gathering feedback, and finding inspiration for other coding projects.
Some of the benefits of CodePen for web development include:
- Various CSS options: CodePen makes it faster and easier to write CSS with Normalize.Css, Reset.Css, Prefix-Free Autoprefixer.
- Supports different flavors of JavaScript, HTML, and CSS:
- Javascript: CoffeeScript, LiveScript, jQuery, AngularJS
- CSS: Sass, SCSS, Less, Stylus
- HTML: HAML, Markdown, Slim, Jade
- A variety of pen views: There are three viewing options to help modify and view pens, including details view, editor view, and full page view.
- Tags: Tags make pens easily searchable so you can find exactly what you are looking for.
Animation Best Practices
Review these six best practices to help you use animations correctly on a website.
Plan Ahead With Your Animations.
Have a plan for how you will animate because your other artboards will also animate if you are using the auto-animate feature.
Your layer structure makes a difference in your animations, and if XD identifies the same two layers between artboards, it will automatically animate every change that happened on one layer to the other.
XD will only animate those layers if they share the same name and group. The way you design the first layer structure of your artboard will be essential to the success of the artboards you create later on. A good habit to practice is to manage your groupings and layers from the beginning of the design.
Don't Animate Everything.
We know you can animate everything, but you shouldn't overdo it. Animation needs to be functional, and it should serve a purpose other than being whimsical, funny, and quirky.
You want to make sure you're resisting the urge to show off so you can ensure your animation design doesn't create too much cognitive overload for users.
Pay Attention to Easing.
A common mistake that is often made by new designers is forgetting to select easing options. Easing changes the speed of an animated object over the duration of the animation.
Use ease-out for objects that are coming into view. This causes them to slow down before they stop in their final position. This makes the animation look much more realistic than linear easing that causes objects or animations to come to an abrupt halt.
Make Sure Your Animations Are On-Brand.
Of course, you want your animations to have that "wow" factor, but you need to consider how the animation fits the brand and situation. If you love lime green, but the brand colors aren't lime green, you should probably use a different color that correlates with brand colors.
The movement of an animation is also important to consider when matching the tone and overall message a brand is trying to convey. This may take some time since most brands don't have animation guidelines.
Remember That Your Animations Won't Behave the Same Way on Every Device.
Test animations in different conditions. Most designers create animations on advanced devices that aren't available to everyone who will access a site with an animation. Sometimes an animation causes user issues instead of enhancements.
A good idea for ensuring smooth experiences is avoiding layout reflows. Instead, stick to "opacity" and "transform."
Make Content Feel Alive.
When you include live content on your app or website such as comments, pictures, or some other counter, it can be helpful to animate them. Animating live content allows you to cushion the loading time of the elements and it smooths the transition of the new elements on your site.
Let's take a look at how you can start creating animations using either AdobeXD or CodePen.
How to Create Animations Using Adobe XD
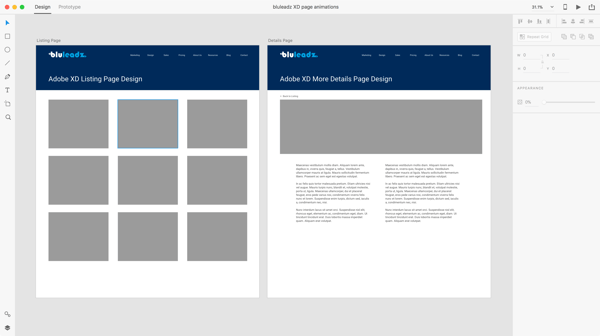
For simple page animations and adding context to how each page fits together, Adobe XD is the perfect tool – not to mention, it's also an extremely quick way to design page layouts.
Adding page transitions in Adobe XD
1. Start with at least two artboards. Each artboard represents a page (or a new view in your app).
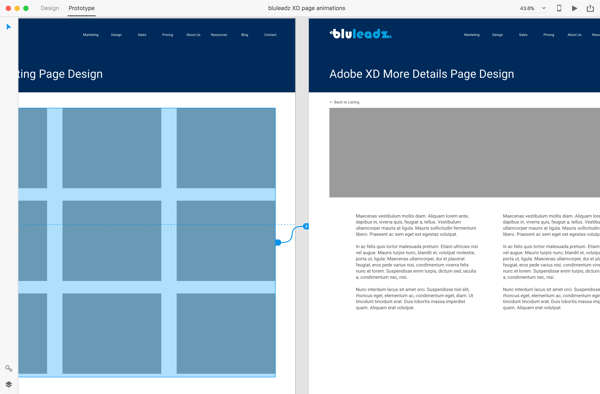
2. Once you have multiple artboards set up, click on the prototype tab.
3. Then, you're going to want to select the element in your design that should be linked to the other artboard, such as a standard link for example.
4. Click and drag the blue tab to the corresponding artboard, and then choose your animation type and speed.
5. Click the connector to view the interaction panel and select some of the following options:
- Trigger: Choose an option that triggers an animation. For instance, you can select Tap to see a tapping card experience.
- Action: Choose Auto-Animate.
- Destination: Select the artboard destination to trigger the animation.
- Easing: Select an easing option. For instance, choose Ease Out if you want your animations to ease out from your design prototype.
Once linked, you can click the play button in the top right corner to view the animation, share the preview online, or even create a video walk-through of the pages.
How to Use CodePen to Create Prototypes
For more complex animations and animating specific elements on the page, CodePen is an extremely quick way to prototype. It has built-in CSS and HTML preprocessing, and everything created on the site is easily shared.
How to Use Pens
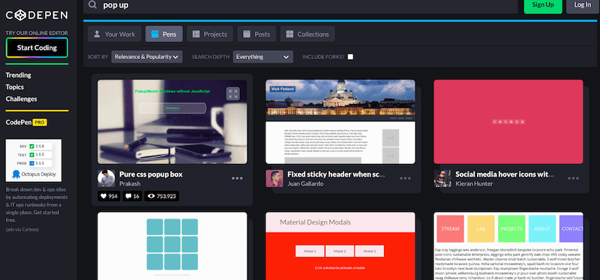
1. First, you'll need to create an account in CodePen. Click the green Sign Up button in the upper righthand corner. You can select a free account or check out the pro plans.

2. CodePen features a ton of pre-built "pens" that users can copy and paste. To find a specific animation, just use the search tool.
3. Search through your options. To see an animation in action, click into it. Here, you will also see the HTML and CSS coding.
4. Once you find an animation you want to use, copy either the HTML or CSS code that is shown above.
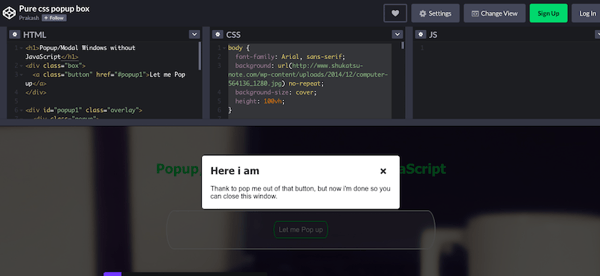
5. Then, paste the code wherever you are developing your website page. You can continue to edit and customize the code to fit your needs (i.e. changing color, animation speed, transitions, text, etc.)
The effort your development team puts into the animations for your website can become an intrinsic part of an aesthetically pleasing and responsive user experience. The sooner you begin adding these exciting elements to your website, the sooner your user will appreciate it and you can take advantage of the benefits.
.png)
Comments