
In a hyper-competitive business landscape, being able to provide top-notch customer service can provide a crucial advantage. In this article, we’ll cover the benefits of HubSpot’s ticketing system and how you can use it to enhance your customer service processes for greater customer satisfaction, retention, and upsells.
The Benefits of Using HubSpot’s Ticketing System
So, what are the benefits of using the ticketing tools that are built into the HubSpot platform for your organization?
Some of the biggest benefits are:
- Streamlining Ticket Management in a HubSpot-Native Tool. There are many different software tools for tracking customer tickets and managing interactions. Many of these tools help to streamline ticket management in some way, but with HubSpot’s ticketing system, you get tools that are completely integrated with your customer and contact database. This enables seamless tracking of customer activity across the platform so all of your teams can gather more in-depth information about them to enhance the customer experience.
- Improving Customer Support Response Time. Another benefit of HubSpot’s ticketing system is that it helps you improve your support team’s time-to-first-response metric. Using alerts and emails to notify service team members when a support request comes in can minimize the delay between a request being submitted and when it’s addressed.
- Ensuring the Right Reps Are Assigned to the Right Requests. In some organizations, it’s necessary to have different service team members specialize in different kinds of issues to ensure that they can adequately answer customer needs. By pairing the ticketing system with a workflow that sorts incoming requests based on the particulars of that request, you can automate the process of assigning requests to the right customer service teams (or individual reps) who are best equipped to handle those requests.
- Tracking Ticket Progress and Statistics in Real Time. How is your customer support team performing? Are they meeting their SLA goals or do they need help? HubSpot’s ticketing tools collect data about your tickets and customer interactions that you can use to review your service and support team’s efforts and make adjustments as necessary.
- Enhancing Customer Communication. Through the tickets index, users can click on a ticket name to review the status and, from that ticket record screen, quickly set up emails, phone calls, or meetings as needed. This helps keep your support team in touch with your customers who have submitted report requests. You can further enhance this by creating workflows that assign “call customer” tasks to support team members based on customer service SLA due dates.
Other Tools to Enhance Customer Services
 Being part of a larger platform means that the ticketing system isn’t the only tool you can leverage to enhance customer service interactions. Several of the key benefits of the ticketing system actively rely on other HubSpot tools to achieve their maximum effect.
Some of the other HubSpot tools that you can use to enhance your customer service and support processes include:
- The Conversations Inbox. This is a centralized location for communicating with contacts and customers. Here, you can track incoming communications, generate tickets from conversations, and see if any incoming communications have been missed.
- The HubSpot Workflows Tool. This comprehensive automation tool allows you to set up automated actions that happen in response to specific criteria. For example, you can create a workflow that triggers when a customer fills out a support request form that gives them an immediate reply letting them know a support team member will reach out soon—then generate a task for a member of the support team to reach out to that customer via email, text, or phone as needed.
- Data Dashboards. Want to see all of your customer service metrics in a centralized location so you can parse them more easily? Consider setting up a custom dashboard in HubSpot that assembles reports featuring the data points you need to know to optimize your customer service/support team’s performance. You can use either default reports created by HubSpot or customize your own reports to make them as specific as you’d like.
- Personalization Tokens in Emails. Have a lot of support requests that all discuss the same issue? Consider creating an email template that uses personalization tokens for customer-specific information like their name, account number, or other personal identifiers that you can then use to send to all customers with that issue. This can help you save time for your customer service team when replying to frequently encountered issues so they don’t have to type out emails one at a time or manually enter customer information into a template for every email they send.
These are just a few of the tools available in HubSpot that you could use to enhance your customer interactions. Do you have a favorite tool to use for customer service? Share it in the comments section at the bottom of the page!
Setting Up HubSpot’s Ticketing System for Seamless Customer Support
So, how can you set up your ticketing system in HubSpot to provide seamless customer support? While there may always be room for improvement, there are a few things you can do to set up your ticketing system in HubSpot to make it easier to manage moving forward:
1. Customizing Ticket Properties for More Efficient Management
HubSpot provides a variety of useful default properties for tickets—but they can’t account for every business’ unique needs and processes. To help streamline your customer support in the HubSpot tool, it’s important to create custom ticket properties in HubSpot.
To create a custom property for tickets:
- Go to the settings menu (click the gear icon in the upper right of the main HubSpot nav menu)
- Go to “Properties” under the “Data Management” header in the left nav menu of your settings
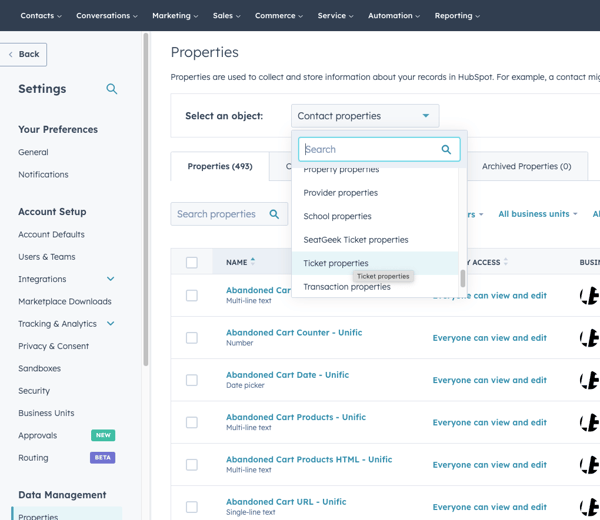
- In the “Properties” tab, click on “Create Property”
- Click on the “Object Type” dropdown and select “Ticket” from the slide-in menu
- Assign a group for the property
- Create a label for the new custom ticket property
- Click “Next” to continue
- Choose a field type from the dropdown menu:
- Text input, single checkbox, date picker, number, file, rich text, or HubSpot user—confirm that the label explains what information is needed from the contact
- Multiple checkboxes, dropdown select, or radio select—create labels and internal values for each option in your multiple choice, dropdown, or radio select property
- Calculation—build a calculation in the “Build calculation” tool
- Click “Next” or “Create” (varies depending on field type chosen)
- If “Next,” choose property visibility and validation rules (choices vary based on field type)
- Property visibility rules may include:
- Whether to show in forms, pop-ups, and bots
- Whether to show in search results
- Validation rules may include:
- Requiring unique values
- Setting minimum or maximum value limits
- Limiting character counts or decimal places
- Restricting to numerical values
- Forbidding special characters
- Only allowing the selection of specific dates (future dates only, past dates only, specific date ranges, or any date)
- Only allowing date submissions falling on a weekday (Mon-Fri)
- Click “Create” to finish
- Property visibility rules may include:
- If “Next,” choose property visibility and validation rules (choices vary based on field type)
2. Automating Ticket Creation
In the benefits section of this blog, I mentioned how you can use automation tools to streamline ticket management. One thing you can do is create forms that help you automatically create new tickets when a customer fills them out.
Here’s a quick tutorial on how to create custom support request forms in HubSpot:
- Click on the “Marketing” dropdown in the main HubSpot nav menu
- Mouse over “Lead Capture” at the bottom of the dropdown
- Click on the “Forms” option from the menu that pops up
- In the forms index, click on “Create form” in the upper right of the index page
- Choose whether to create an embedded form or a standalone page and click “Next”
- Scroll down on the left nav menu and check the “Support” form preset then click “Next” or start from a blank template
- If creating from a “Support” preset, turn on the option to create tickets from the form and connect it to a conversations inbox or help desk—otherwise, you’ll get the option to do this when you attempt to add a form field related to a ticket
- In the “Form” tab, start customizing your support form by dragging and dropping fields from the “existing properties” list or create new properties using the “Create new” option above the existing properties list—the default properties of a “Support” form are Email, Ticket Name, and Ticket Description while a blank template only has the Email property by default
- One custom field to create for this form could be an “issue type” field with multiple checkboxes that allow users to pick one that best describes their issue in brief—things like “missing instructions” or “report defect” which you could have them explain in more depth using the multi-line text in the Ticket Description field
- Click on a field in the form to do things like renaming the field label, adding help text to provide guidance on what customers should do, and set logic triggers for specific situations—for example, if there’s a product defect, you could have a conditional form field appear asking for the product lot # from the box
- Click on the “Options” tab to set what happens on a form fill, adjust customer lifecycle stages based on form fills (setting them to a “support request” stage, for example), and who to notify when the form is filled out
- Use the “Style & Preview” tab to customize the look of your form and ensure it meshes with your branding guidelines
- Use the Automation tab to create a quick workflow based on the form fill to further automate what happens when a contact submits the form
- Give your form an easy-to-remember and search for name like “Customer support request form”
- Click “Publish” or “Update” when finished (the box changes depending on whether you’re making a new form or updating an existing form)
If you enabled the automated creation of tickets or set up a ticket creation workflow using the automation tab, your form will now generate tickets automatically based on form fills as they happen.
Leveraging the Ticketing System for Effective Communication
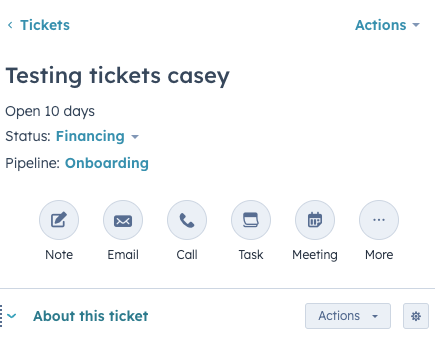
In the ticket record, which you can reach by clicking on the name of a ticket from the tickets index, you can quickly access shortcuts for communicating with customers who have active tickets by clicking on the icons in the upper left box of the record screen.
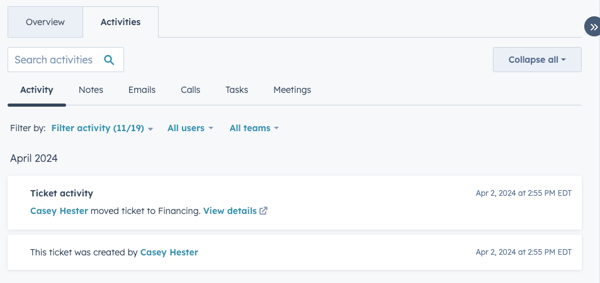
You can also click on the “Activities” tab on the top of the screen to find a list of recent activity on the ticket, review notes related to the ticket as well as emails, calls, and meetings associated with the ticket. This gives you a centralized location from which to track your communications with customers experiencing issues that require support.
In the ticket record, you can check on recent activity related to the ticket and use that to send emails to the customer detailing recent actions your team has taken to resolve their issue. This helps to improve customer communications and increase their satisfaction with your customer service process.
Analyzing Customer Data and Feedback to Improve Service
Your ticketing system workflows, forms, and even processes shouldn’t be a “one and done” solution. As time goes on, it’s important to review your customer support processes and refine them as needed to best serve your customers while keeping service team workloads manageable.
This is where using data dashboards and the analytics from your service reports can prove invaluable. Tracking how many tickets are being generated, how quickly they’re being resolved, and other support metrics helps you assess the health of your customer service department.
For example, are a significant number of tickets missing their “time to first response” SLAs? Then it might help to introduce more automation to your initial response to tickets or, if the service team is meeting individual process metrics (like answering 10 ticket requests per hour), you might need to expand your service team.
In short, collecting data about your service/support efforts can help you help your customers and keep them satisfied.
Need Help Mastering HubSpot’s Service Tools?
Tools like the HubSpot ticketing system can be invaluable for improving your customer service processes and increasing customer satisfaction. If you need help mastering HubSpot’s Service Hub tools (or any other tools in the HubSpot ecosystem), reach out to Bluleadz.
Our team has years of experience in using the HubSpot platform and in helping organizations of all sizes and industry focuses get more out of their HubSpot subscriptions.


.png)
Comments